The kitchen is one of the most utilized spaces in a home. It’s easy for all the dishware, cookware, and appliances to get disorganized and out of hand with the amount of action that takes place there daily.
I’ve come up with a smart, efficient kitchen declutter process with kitchen organization dollar store hacks that’ll refresh the space on the dime and not take up a lot of time. Double win!
Disclosure: Opinions expressed are our own. If you buy something through any of our affiliate links on this page, we may earn a commission at no extra cost to you. Thanks for supporting our site.
Jump to:
- Recommended resources
- Step 1. Clean EVERYTHING out and take inventory
- Step 2. Go through the decluttering process.
- Step 3. Line your cabinets
- Step 4. Designate zones in your kitchen
- Step 5. Organize the cookware zone
- Step 6. Organize the prepping station
- Step 7. Organize the dishware zone
- Step 8. Organize the storage zone
- Optional step. Organize the baking station
- Final step. Admire a job well done
- Conclusion
Recommended resources
- A must-have* for your kitchen cabinets after they're emptied
- This item* is surprisingly easy to shape into useful vessels for all parts of your kitchen
- These baskets* will make keeping your kitchen drawers sorted beyond easy
Step 1. Clean EVERYTHING out and take inventory
The first step to organizing any space in the house is to get everything out, and yes, EVERYTHING. Seeing the empty drawers and cabinets and your mess on the countertops and floor will motivate you to finish because well, you kind of have to at that point.
I suggest putting like items in close proximity. For example, I would keep the food stuff in one area, utensils in another zone, pots and pans in its own territory, etc.
At this point though, don’t think too hard about where things should go. You want to do a quick dump of stuff in general piles, not spend time trying to sort things nicely before you do the actual decluttering.
Step 2. Go through the decluttering process.
Have boxes set up for what will be tossed and given away. When that’s set up, then you can start going through your items to determine what is actually kept, thrown away, and donated.
So you don’t waste away the day overanalyzing whether or not you should keep something, put a timer on to stay focused on the task.
And as you’re going through your stuff, ask yourself these questions:
- How often do I use this? If the answer is someday, it goes.
- Is this a spare? Let’s get practical and save one set for the family for normal use and one back-up set. Seriously, a couple doesn't need to keep 12 cups, for example.
- Does it make my life easier?
Something like this nifty, ultra popular appliance* that you'll use often, keep. Something like a juicer that you only use sparingly because it’s such a huge hassle to clean up, give away.
By the way, if you can’t find a compelling reason to keep it within the first few seconds, chances are you don’t really need it.
Step 3. Line your cabinets
Now that your cabinets are bare, line them with this stuff*.
Batch this task rather than line one cabinet, figure out what to store in there, line next cabinet, etc. Us your shelves are the same size and layout, it may be easier to create use one as a template to cut out multiple liners.
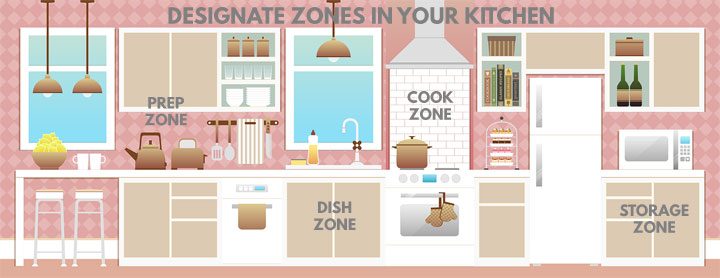
Step 4. Designate zones in your kitchen
Apply the concept of consolidation to your kitchen space by creating zones that will help you be more efficient in this space. The four main zones you’ll want to determine are for your:
- Cookware – pots and pans as well as cooking ingredients like oils and spices should be stored somewhere near your stove
- Prepping Station – knives, cutting boards and the tools you need to prepare your food should be grouped together for easy access when you’re preparing your food
- Dishware – dishware and silverware should be put in cabinets and drawers that are closes to the sink and dishwasher
- Storage – reusable containers, saran wrap, food baggies, and other food storage supplies should be grouped together
- Baking Station (optional) – if you are an avid baker, you may consider dedicating a section of your kitchen to organize baking supplies
Now, let’s tackle how you will put items away that will maximize your storage.
Step 5. Organize the cookware zone
Organize pans in cabinets
You’ll want to tackle the cookware area first, since it contains the bulkiest items. Consider stacking pans vertically like so. This way, you can easily access whichever pan you need while saving space. (via Martha Stewart)Hang pots and pans
Or with this over-the-door tool* and this kind of hook*, you can display your pans as home décor. (via Pin image)Store lids in a commonly underused space
Here's a smart small space storage solution. Lids for your pans can be stored on the inside of cabinet doors using this easy hook*. (via Pin source)Keep oven sheets neat yet within super easy reach
For oven sheets, use wire racks to store them to save space and for easy reach. (via Restoration Beauty)DIY this easy rack
Oils and spices can be on your countertops, but if you want to keep them clutter free, then DIY a spice rack simply by bending this kitchen item*, as taught in this tutorial. This would also work very well as a pantry organization idea. (via The Stonybrook House)Step 6. Organize the prepping station
The next space you want to tackle is the prepping station, just because it will likely be near the stove area.Store cutting boards and cookie sheets
Use tension rods to store cutting boards and cookie sheets upright. (via Architecture Art Designs)Display knives in a decorative way
Keeping knives on the counter allows for easy access. Just this item* and this item* are needed to create this aesthetic display. (via Home Talk)Step 7. Organize the dishware zone
Dishware for everyday use should be as easily accessible as possible. More fancy dishware or items you don’t use as item can be stored further out of reach.Create this stand for your dish soap and sponges
Speaking of dishes, you’ll also want to organize your sink area and keep it free of clutter. Here is a DIY stand for your soap and sponges. I love how you can catch water in the pan and empty it, rather than have the water collect along the edges of the sink. (via Craft and Tell)Compartmentalize kitchen utensils
Silverware can be organized in kitchen drawers with these versatile organizers*. (via The Elm Life)Step 8. Organize the storage zone
Use this space-saving trick with rolls of stuff
Things like aluminum foil and saran wrap should be stored vertically to save space. Use something like this* affixed to your cabinet door to keep the clutter out of sight. (via Your House and Garden)Stack food storage containers and lids separately
For food storage containers, the variety of shapes and sizes makes most sense to store in a bottom cupboard. But it can be awkward to dig in the back for a container and a right-fitting lid.
The solution to that is to buy a large clear tub that you can easily pull in and out from the cupboard. Fit a smaller basket just for lids into the larger tub and voila, everything is separate yet together, like they should be. (via The Organised You)
Optional step. Organize the baking station
Check out my post on clever baking cabinet organization hacks for clever ideas for a sweet-looking kitchen.Final step. Admire a job well done
Revel in the beauty of your newly organized kitchen, ingrain that gorgeous sight to your memory…and try to keep it that way as long as you can!
Conclusion
Now you know the perfect way to declutter the kitchen and organize the entire space for under $20 with these great kitchen organization dollar store hacks. Messy piles of cookware and dishware no more!
Continue Reading: Home & Garden posts →
Jackie says
I am loving all these organization tips! We are painting our kitchen cabinets here in Utah County & I want to make sure the insides are nice and organized after. Thanks for all the inspo!